The bloom pass, blur pass, Depth of Field pass, Ambient occlusion pass, antialiasing pass, and finally a God Rays pass to bless the final render. If you play video games you've likely seen these names in the settings every time you turn off motion blur. I despise motion blur.
These are post-processing effects, they take the rendered image and apply a shader to it. This means rendering 2 times. One for the regular render of your scene (process), and one to apply the shader effect to your last render (post-process)
ThreeJS has a great guide on how to get started with post-processing. However, rather than looking at the most popular post-processing effects, today I wanted to look at more bespoke and unique post-processing effects.
Getting started
- How to use ThreeJS post-processing
- Getting started with the "postprocessing" library
- Persistent fade effect in ThreeJS
- Water-like postprocessing distortion
- How to: Webgl pixel perfect outlines with Postprocessing
- (Not Webgl) 3D Game shaders for beginners
sponsor

Unicorn Road is Looking for a ThreeJS Developer
Unicord Road is a design and development agency looking for a kick-ass ThreeJS Developer to help them enhance their existing WebGL experience based on my Infinite light tutorial. If you are interested in a project apply on their website!
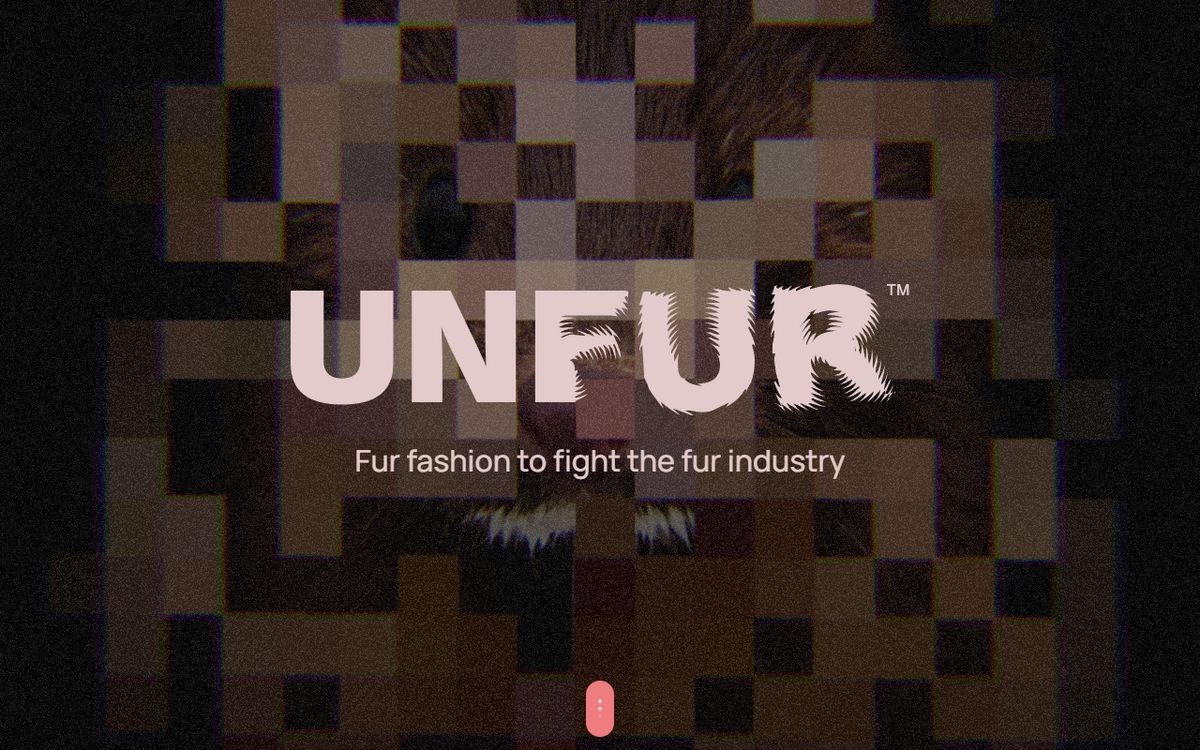
Learn More!Radial RGB Postprocessing
On UNFUR website, they create an RGB distortion with the displacement calculated very similarly like how a refraction effect works. This creates the effect that the RGB is expanding from the middle.
vec3 cameraDir = vec3( 0.0, 0.0, - 1.0 );
float y_refracted = refract(cameraDir, normal, ior / y_ior );
float c_refracted = refract(cameraDir, normal, ior / c_ior );
float v_refracted = refract(cameraDir, normal, ior / v_ior );
However, instead of doing straight RGB, they split the Yellow, cyan, and Violet bands instead. Following the technique described in this paper.
Amazing ASCII post-processing effect
James' portfolio effect is mind-blowing, and one of my inspirations for writing articles. Thankfully James explained every detail of how he created the effect in his blog.

Spider-verse post-processing shader
A lot of post-processing is done in multiple steps. For this demo, Jaume does 4 different renders/steps:
- Regular scene render (colorTexture): Part of the coloring/shading is done here
- Normal pass (normalTexture): Save the normals into a buffer for the following pass.
- Lines/Dots/Outline: Using the normals it can calculate where to place lines and where to place dots.
- RGB Pass: An RGB distortion that gets stronger the farther you are to the screen.
Scene Distortion Intro post-processing
While Victor's folio isn't as obvious as the other demos, this is a post-processing effect. First, like all others, it renders the scene as it'll look in its final position.
Then, in the post-process where the movement and the distortion from center-ish happens:
vec2 dirFromCenter = normalize(uv - 0.5);
float force = 0.5 * uEffect;
vec2 offset = dirFromCenter * force;
vec4 color = texture2D(uSampler, uv + offset);
Of course, this is just an approximation. Victor's math is more complicated than this. Allowing him to tune the displacement, to only apply it at the bottom, and even to fade the WebGL when needed.